Sunday 20 May 2012

Lyme Regis Species Hunting & Battleship

A last minute trip was made for a short kayak trip out to see the battleship HMS Edinburgh, anchored up off of Lyme Regis when I looked out my window this morning. The idea was to paddle up and take some pictures before going off for a short fishing session.

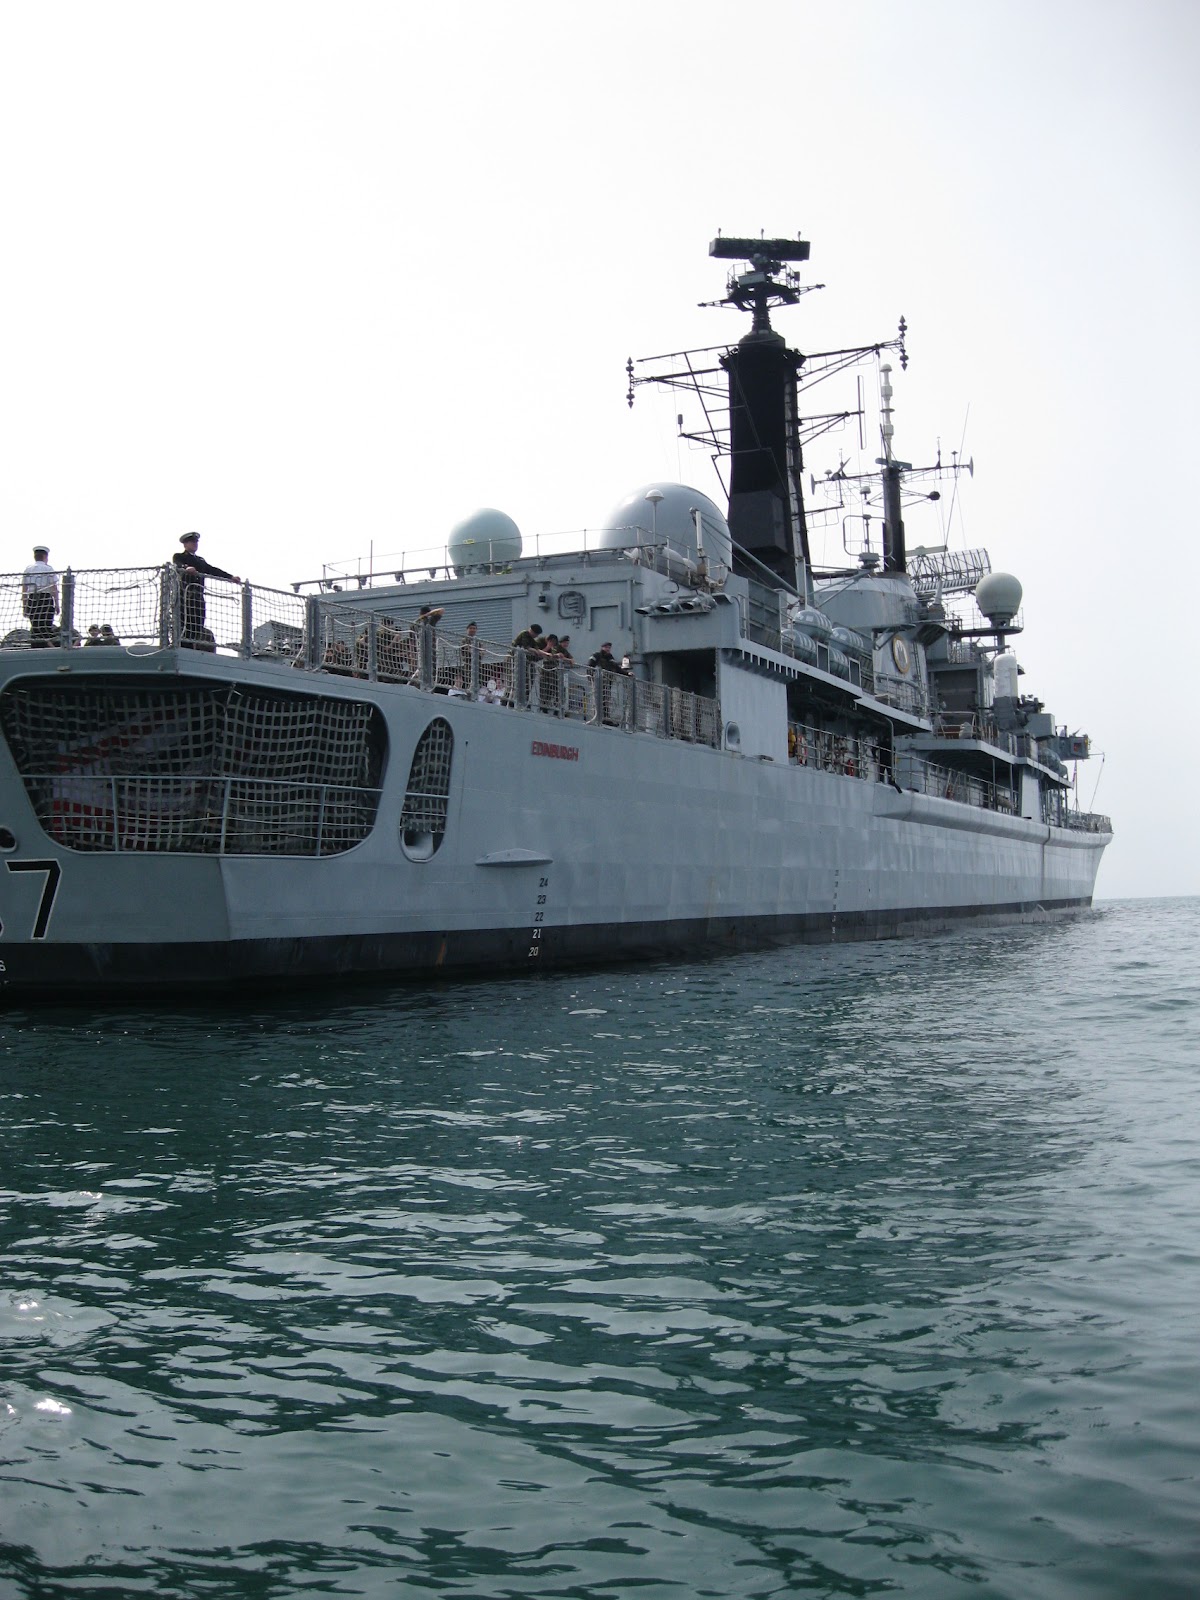
I took a few photos as I got closer to the ship, I asked one of the crew who was handing out military leaflets on the shore, ''How close am I allowed to go?'', ''50yards'' was my answer...

Got rather close and was admiring the vessel when I look up and see a chap with a machine gun looking right down his scope at me. He followed me while I circled the front of the boat and then I thought I'm off fishing before I get shot! The ship itself was huge when I paddled up to it, the picture from the front shows how far it sticks out of the water, it looks like it should just topple over!

Quick toilet stop with the ship in the background, I covered a fair few miles in the end. The ship is a couple of miles in the background. A quick relaunch saw me paddle for the fishing grounds I wanted to try.

Anyway the fishing was ok, for species hunting anyway. I got some good experience anchoring and snagging twice but managed to break free both times... Eventually! I had to let alot of my anchor line out and paddle at full speed to break free but it worked both times. In the end I had a few Pout, a first Poor Cod from the kayak, Dogfish galore, Ballan and Corkwing Wrasse, Mackerel, a Garfish and a Black Goby which was a new fish for me. So with 8 species and 1 new one I was fairly happy. Below is the picture of the Corkwing Wrasse and Poor Cod.
Then a picture of the Back Goby, at first I thought it was a Rock Goby but after checking with someone it was confirmed as a Black Goby. This was due to the fact it had an elongated dorsal fin and the Rock Goby does not have this.

Now the best moment and catch of the lot... I hook something that is a very heavy weight and it seems like I am stuck on the bottom. However, a fish is definitely hooked, so I keep a bit of pressure on it hoping it will pull free when I realise it is slowly coming up. Whatever it is, it's really heavy!!! I'm thinking a big Ray had sucked bottom at this point, then after 5 minutes of heaving and anticipation I see a Garfish on the top hook. I think surely there is a Ray on the bottom hook.
NOPE, IT'S THIS ON THE BOTTOM...
A ROCK FISH!
On the way back in I saw another kayaker fishing at anchor. He was pulling up lots of mackerel and I had a good chat with him. We spoke about Bass fishing so I offered to take him to a few marks in the summer and guarenteed him at least one or two, lets hope that hasn't jynxed me! It's also clear this sport is really taking off and it's great to be a part of it.

Wednesday 16 May 2012

Anchor Trolley Set Up

Anchoring is one of the most dangerous things about kayak fishing. I will show you how I have set up my system and try to explain how to use it correctly. The picture below shows the bits needed for the anchor trolly.


Firstly, you cannot just drop anchor and tie it to any part of your kayak. This will drastically increase the chance of capsising and basically just put you in an uncomfortable position, therefore you use what is known as an anchor trolley. The way this is set up consists of two small bungees at either end of the kayak that act as a sort of shock absorber. These will then be connected to pullys in order for a rope to rotate from bow to stern.

The picture above (right) shows the lower line running through eyelets to keep everything 'tangle free' and tidy. The top of the line is left free running so the loop can be pulled to the bow or stern.
This loop will help guide your anchor line to the bow or stern to give a stable and safe anchor while preventing it twisting up with the anchor trolley. On the other picture above (left) is the cleat to secure the anchor line, this also provides a safety 'quick realease' function should you need it. I have seen a few incidences, one of which another kayaker was being dragged by his anchor rope by an ignorant boat user, and your life may be on the line so to speak.

Below (left) is a picture of the anchor set up, you can see the floating anchor line (10-15ft) going through the loop and onto a divers reel. This holds around 80m of line (around 200kg braking strain). A buoy is connected to this so when the floating line is released it is easy to retrieve. From this is around 1.5m of chain. This has two reasons, one is to sink the line to the bottom so the pull is sidewides on the anchor, helping it grip. The second is to prove a safety release. You can see a cable tie (below) that takes the strain of the anchor at the top of the anchor, this has a small cut in it to weaken it. If your anchor then gets snagged, a strong pull will snap it and revert the anchor, pulling it out backwards.
So this is how it is rigged, but how do you use it correctly? Well firstly BEFORE dropping anchor you must run the floating anchor line through the trolley and pull it to the bow or stern, however prefered. The reason for this is if the line pulls tight before this is done you put yourself in a dangerous situation as you will now be anchored from the side.
Once that is done you can now drop anchor, the standard recomendation is 3 times your depth. If you do not have a fishfinder then drawing lines on the anchor rope every 5 meters will help you judge it.
It is always good to practice in safer conditions if it is possible, so try flat and calm waters that are shallow, even if you can stand up, just to practice the routine.
I hope this helps and any suggestions or questions i'd be happy to help.

Monday 14 May 2012

Maiden Voyage - Swanage Ocean Classic 2012

After running around all of Friday night, I rigged up the last bit of my fishfinder and battery, made a couple more scratching rigs and loaded the car ready for the trip across to the Swanage Ocean Kayak Classic competition. This was going to be my first trip from my new Ultra 4.7 and it was equipped enough to give the competition a real go although it was far from a finished project. With all the running around setting the kayak up, I forgot to pick up my bait that night, so hope was hanging on Swanage having some spare worm and with 140 people entering, I wasn't too confident!

I arrived nice and early and set everything up and then went to have the briefing from the organisers. The safety brief was actually very interesting as I learnt a few tips I didnt know such as waving the paddle vertically in the air is the standard 'SOS' signal.
The format was explained and the competition was to be decided on the most number of species caught, you photograph the fish next to your card, then release it alive. This was a great way of doing things as it must have saved hundreds of fish and kept kayak fishing in the 'good press'. If things ended up as a draw the first person that weighed/signed in would win so if you caught alot of species quickly, you could come in early but would also gamble that no one had more than you or managed to catch more in the extra time they had at sea.
I set off around 10 and dropped down with some small course hooks and pulled up a Shanny (or Blenny) on the first drop. Next I started drifting after breaking my anchor trolley and picked up a Garfish and a Mackerel.

A tip for anyone making an anchor trolley is not to buy the style of elastic bungee in the first photo below as the cord is only stapled and this is very weak, this is what broke during the competetion. Anyway, lesson learnt and the next photo shows what I have now done which seems a lot stronger than my original idea. I will do a write up in my next post about the whole anchor system.
The next plan was to target Wrasse and after a 1/2 mile drift I finally landed one. I knew one more fish in the next half an hour would put me up there so I paddled straight out into the deep water, dropped anchor with a load of rubby dubby and was soon graced by the for once, elusive Dogfish. I can also add this was the first time I have ever netted one of these!

I had around 45 minutes left so the decision was made to head in. This proved to be a wise choice as I made it in as the joint highest species after one other person. That is also how it stood, 133 people landed and I sat in second place.

I was over the moon at this and ended up winning a Prowler Elite 4.1 which I will review and post at a later date. I was still amazed how only 5 species won it, especially as 19 were caught between everyone on the day including Brill, Bream and Undulate rays! Two lessons I learnt during the day that I would recommend to any kayak fisherman is take your wallet out of your back pocket BEFORE you launch and dont wear a hoody under your drysuit, it was extremely uncomfortable all day to say the least!

The kayak itself was the first time i had used it, compared to my old perception freedom, it was a dream to paddle. The kayak cut through the water even in a bit of chop and it was weird to think how a heavier and bigger kayak can be easier to paddle. The flip centre hatch was amazing, so much storage which is what solved the main problem I had with my other kayak. This along with my dry vittels well, worked wonders.
Finally, I will add a bit on the safety of this event. It was second to having a personal lifeboat crew. The two safety boats did extremely well monotoring everyone and the communication over the radio was brilliant. All in all a wonderful day to be involved in and a huge thank you on my behalf for what I must say was the best organised fishing event, especially of this size, I have ever been to.

Wednesday 9 May 2012

Fitting The Fishfinder

Full report to come, for now here are some pictures of it all fitted.


Friday 4 May 2012

Dry Box / Fish Box

I have just got the new Ultra 4.7 that I have been wanting for a while now so with a morning off work, I decided to start getting it ready for its maiden launch.
I bought a Vittels pet food container that I have seen other kayakers use as a live bait and dry box. One thing this meant was I could also add rod holders to the side for extra storage.
First of all I fixed an eyelet inside the lid.
This was stainless steel with all fixings also being marine grade stainless, for obvious reasons. Next was to fit another eyelet inside the box and tied some cord to both that and the lid. I took this opportunity to minimise drilling holes and fix back to back eyelets so that the box could be secured to the kayak later.

Back to back eyelets.
Next up was to fit the rod holders, they were positioned and marked out and simply bolted in place.
The elastic straps were then attached to the front of the box and clips tied to the end of this for fixing to the kayak. I then made the final fixing by bolting on another eyelet at the back so the box would be secured from all sides, again the elastic and clips were fitted.

Then a final view of it attached to the kayak. The total cost was around £40, I have also now fitted a handle for easier transport as it is also useful for carring your other equipment down to the shore or in my case, down the road where to where my kayak is stored.
Where to get Vittels box
http://www.rlpetproducts.co.uk/store/horses/brands/vittlesvault/ - £20 delivered
White tube rod holders I rang this place
http://www.lymetackle.com/ - £3.99 each
Stainless eyelets from here (pack of 10)
http://www.h2okayaks.com/engine/shop/product/c12271/Stainless+Steel+Pad+Eyes+%28Pack+10%29 - £6.95
Stainless m5 screws (bolts)
http://www.screwfix.com/search.do?fh_search=m5+bolts - £2-3
I also got the elastic and carabiners from H2o kayaks (same as the stainless pad eyes) - £5-6

And it still leaves you with extra bits to use else where!!!

Tuesday 1 May 2012

Choosing The Right VHF Radio

I think there may be a pattern developing here... Yes, I'm going to talk about selecting the right VHF from my experience in buying a 'cheaper' one, and almost paying the ultimate price!

I have just recieved the Icom M23 Float and Flash. They retail at around £160 but are available at some places for £120 if you look hard enough. Previous to this I had the Cobra MR HH125. I wish I could say more about this VHF, but it broke on the first trip, which I think, says enough.
That was on a 4 mile paddle, straight out from Lyme Regis. That day the wind went offshore to 15mph and it took over 2 hours to get back. What you've got to think about though, is ''what if'', because if I had flipped then, a mobile would have been of no use (even that broke on this trip)!! So why pay £120+ and not £50 - well, if you value your life more than the extra £70, thats why.
Here is the new radio, I've had a scroll through its features and here is just a few you get, that you don't with the Cobra.
  • Mains Charger (hard to believe but the Cobra only had a cigarette lighter style charger)
  • Float and Flash (flashes when submerged in water so can use it at night)
  • 3 Year Warranty (speaks for itself)
  • 5 Watt Signal Strength (for longer distance communication)
  • Longer Operating Time
  • Fixed Clip (the Cobra fell off when tilted at a certain angle)
  • Squelch (filtering out weak and strong signals)
and it goes on...
It really is important when kayaking to not hold back on safety. I will do a full post on other safety stuff in the future, my next post should be about rigging up my new kayak, so watch this blog for more on that!

The Old Project

I thought that it would be good to post a few pictures of my old project, the Perception Freedom, which has now been sold. It may offer some advice on mistakes I have made and future solutions!
This first picture shows the kayak after I fitted the front, middle and rear hatches, as well as the front rod holders and rear flush mount rod holders. Nothing went wrong here, it was as simple as drilling, cutting with a stanley knife, dropping the hatches and rod holders in, then bolting in place, although later the bolts were changed for the highest grade stainless steel (first lesson learnt)!
So after this I had the need to fish at anchor, as drift fishing wasn't always the best, especially if I wanted to target a fish such as Bream and put some groundbait down.
Eventually I stuck this on the side...
I think I did a good job with this mod, the downside was the shape of the kayak and if done differently I would have ran the trolley on the angled part just above where it is now and not along the side so there wasn't any drag when the sea was a bit choppy. Apart from that, the set up was very effective.
The next part is something that was really done in a rush... the fishfinder...
The fishfinder was a new toy I was dying to use at the time, so I fitted the transducer to the bottom ''ok'', but would have bought or made a case to mount it in if I were to do it again. The battery was put in a box and fixed down with velcro. Again I would have done this differently by sticking a foam surrounding that a small waterproof box slid into with a cable gland going through the container, not a hole drilled in the box.
I would have also put a cable gland to the side of the fishfinder instead of drilling through the base of the fishfinder holder - if only I knew about cable glands before!
A typical cable gland
Finally, the picture below shows the kayak before it was sold. I did start a livebait tank project that I never finished in time. I had it working in the pond, but just needed to make some final fixings and test it! Hopefully the new owner has finished that off. I even made a circuit to time how long it pumped, stopped pumping and could reverse and empty the container.
The photo below is the circuit I designed at home.
As you can see, the other mods were to position rod holder mounts closer to the seat so they could be brought forward when at anchor. If I were to do this again I think I would just fit flush mounts backwards or use RAM tubes.
There was also everything else such as bait box, tackle boxes and GPS (yellow) all fixed by velcro which I now do not have to worry about as the Ultra 4.7 has a rod pod that will store tackle, bait and food, as well as having a proper RAM mount for my GPS. My catch will also be stored in a crate behind the seat.

Anyway I hope this helps and points out the many mistakes (or not as effective mods) I made when modifying my kayak. Hopefully my next post will be about ''how to'' and not ''how not to''.